Showing posts with label lime. Show all posts

Tuesday, May 12, 2009

How To: Cocktail Lime (or Lemon) Wedges & Slices


Nothing sets off an ice cold, summer cocktail better than a Lemon or Lime wedge or slice. Quick and very easy to dmake, the only specialised piece of equipment you need is a Canelle Knife (Check out the Gustav Emil Ern, Tools, Canelle Knife, Right Handed)


Lime Wedges


Start at the top in the middle (near the stalk bit) and cut away a strip of the lime zest around the lime in a circular motion until you get to the bottom. It doesn't matter if the zest breaks part way through the cut but with a little practice you'll be able to peel a full zest strip in one go. You should end up with something like the photo below.


With a sharp knife cut the lime in half, cutting across the exposed white part of the lime as shown below.

Depending on the size of the wedges you want cut each half into two or three small wedges like so:


Easy... :O)

Lime Slices

This time start at the top of the lime with the canelle knife and cut vertically down to the bottom of the lime to remove a short strip of zest (by the way, keep the removed zest strips from wedges and slices, they are packed with flavourful oils and can also be used to add to cocktails or to wipe around the rim of your cocktail glasses).

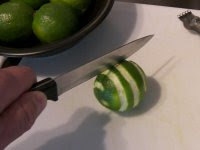
Turn the lime around 180 degrees and make another vertical cut - opposite to the first cut. Then turn the lime 90 degrees and cut two more vertical strips between the first two cuts. Cut again between each of the first four cuts giving a total of eight vertical cuts. Your Lemon or Lime should look something like this...


Turn the lime on it's side and cut the end off, the end can be used turned inside out and filled with a liqueur to be floated on the top of some cocktails.

Slice the lime as shown below,

and you end up with a few of these.

If you want to sit the slice onto the edge of a cocktail glass, make a single cut from the edge to the centre like so...

The lime slice can then be easily and securely placed onto the rim of your glass.

Cheers!


Monday, April 27, 2009

The Perfect Gin & Tonic

As the dark, cold days of winter once again pass into the warmth of a new spring and summer it's time to get into the swing of things with some nice cocktails. My favourite cocktail has to be the cool and classic Gin & Tonic, but it has to be made just right - believe me it does make a difference!

Ingredients (makes 2 large G&Ts):
  • 100ml (4 x 25ml shots) Gordon's Dry London Gin
  • Schweppes Indian Tonic
  • Ice (lots)
  • Fresh lime - cut into four wedges

Method:
  1. Fill 2 tall, straight glasses (Slim Jim/Highball 10oz or 12oz) with ice
  2. Squeeze one lime wedge into each glass and sit the other lime wedge on the ice.
  3. Pour 50ml Gordon's Gin over the ice
  4. Top up with the Indian tonic
  5. Enjoy :O)
One of my pet hates, when seeing drinks mixed, is to watch the ice being added at the end. To many people it may seem that it doesn't matter. It does! In this case, pouring the gin over the ice releases a lot more of the subtle flavours than simply adding a couple of ice cubes at the end.

I just looked at my watch and it's a little early but in an hour or so I shall be happily fixing myself a G&T - if you read this in time why not join me :O)

Cheers!

Monday, February 23, 2009

Lemon & Lime Baked Cheesecake

I don't know about you but I absolutley adore Cheesecake and I have recently discovered the delicious, mouth watering, Goddess of flavour, the baked type of Cheesecake. I say I discovered it but truth be told it was my Mum who started making us these amazing Raspberry baked cheesecakes some time last year.

Recently my folks went away for a few days around Bordeaux in their motor-home so I decided a recipe raid was in order and, having broken into their house, went on a rampage through the kitchen seeking that oh so special recipe... it would be mine... oh yes, it would be mine.

Alas, I couldn't find the recipe anywhere so having hired a team of builders to repair the damage to my folks house I set about Googling for baked cheesecakes.

After a few disasters I set about creating my own hybrid recipe and this is what I'd like to share with you now - when my folks return from their holiday I'll ask Mum to post her recipe on here too but for now....

You'll need the following:

A round baking tin thing (22cm), you know the ones with the pop out bottom - greased. (I had to wash mine and start again after my wife informed me butter would be better than the car axle grease I was using)
An electric whisk - A hand whisk will suffice but please read on....
Plastic or wooden spoon
Couple of glass or plastic bowls
A tall, straight drinking glass (slim Jim) for forming the sides of the biscuit base
A knife or two and an egg whisk
A glass of red wine or your preferred beverage (optional)

Ingredients:
  • 250g plain sweet biscuit (crumbed)
  • 125g butter, melted
  • 3 eggs, lightly beaten
  • ½ cup castor sugar - regular sugar blended in a mini food processor works ok too
  • 3 x 250g packets plain cream cheese, softened.
  • 3 teaspoons grated lemon rind - use a canelle knife if you have one
  • ¼ cup lime juice
Method:

1. Lightly grease your 22cm pop out bottom baking tin with some butter - if you want a deeper cheesecake, use a smaller diameter tin though you may have to increase the cooking time to allow for the extra depth, possibly in a slightly cooler oven.

1b. Take a sip of the wine or your chosen beverage.

2. Mix the biscuit crumbs and melted butter together in a bowl using a plastic or wooden spoon. You'll be able to tell when the mixture is combined enough as it will begin to stick together when pressed with the back of the spoon.

3. Add the crumb mix to the baking tin and use the tall drinking glass to press the crumb mixture evenly over the base and up the side of the tin.

4. Refrigerate the biscuit crust for around an hour.

4b. Take a seat and have a read or watch the TV with your wine or chosen beverage. After 45 minutes (15 minutes before your biscuit base is chilled) put your oven on set to around 160-170C and continue to stage 5.

5. Crack the eggs into a bowl and beat them together with the sugar with an electric mixer until pale and thick. Hand whisks are OK but this process can take up to 10 minutes...

6. Add the cream cheese, grated lemon rind and lime juice and then continue to whisk the mixture until it is smooth and creamy.

7. Pour the mixture into your chilled and crumb base filled baking tin and bake in the oven for about 45 minutes. Note: You should remove the baking tin/crumb base from the fridge prior to pouring in the mixture and placing in the oven :O)

8. After cooking, allow your cheesecake to cool in oven with door ajar, then refrigerate for several hours or overnight.... overnight? yeah right! I lasted 4 hours.

9. To serve. decorate with cream and fruit if you wish, I used a home made raspberry sauce that I found kicking about in the back of my fridge.


Recipe notes
Low fat cream cheese works just as well and with no apparent loss in flavour.

Sunday, February 22, 2009

Tequila Lime Chicken

This tasty chicken dish combines the tangy flavour of the tequila and lime marinade with a creamy, south western style dressing and tops it all off with a melted cheese blend. Note: Be sure you don't marinade the chicken longer than 3 to 4 hours or the citric acid in the lime juice may toughen the chicken. You can serve this dish with your choice of rice but personally, I love this dish served with crispy, thin cut chips (French Fries) with maybe a little salsa on the side. Serves 4

Ingredients:

For The Chicken Marinade
  • 1 cup water
  • 1/3 cup teriyaki sauce - see our Chicken Teriyaki recipe
  • 2 tablespoons lime juice
  • 2 teaspoons minced garlic
  • 1 teaspoon mesquite liquid smoke flavouring
  • 1/2 teaspoon salt
  • 1/4 teaspoon ground ginger
  • 1 shot (25ml) tequila

4 chicken breast fillets

For The Mexi-Ranch Dressing
  • 1/4 cup mayonnaise
  • 1/4 cup sour cream/creme fraiche
  • 1 tablespoon milk
  • 2 teaspoons minced tomato
  • 1 1/2 teaspoons white vinegar
  • 1 teaspoon minced canned jalapeno slices
  • 1 teaspoon minced onion
  • 1/4 teaspoon dried parsley
  • 1/4 teaspoon Tabasco or a hot pepper sauce
  • 1/8 teaspoon salt
  • 1/8 teaspoon dried dill
  • 1/8 teaspoon paprika
  • 1/8 teaspoon cayenne pepper
  • 1/8 teaspoon cumin
  • 1/8 teaspoon chili powder - you can increase this for extra heat
  • pinch garlic powder
  • pinch ground black pepper

For the cheese melt topping and crispy base
1 cup grated Cheddar/Monterey Jack cheese blend (M Jack can be hard to find but to be honest I've made this dish using all sorts of cheeses (as long as they melt).
2 cups crumbled corn chips or fried tortilla strips

1. Prepare marinade by combining marinade ingredients in a medium bowl. Add the chicken to the bowl, cover and chill for 2 to 3 hours.

2. Make the mexi-ranch dressing by combining all of the ingredients in a medium bowl. Mix well until smooth, then cover dressing and chill it until needed.

3. When you are ready to prepare the entree, preheat the oven to high broil. Also, preheat your barbecue or indoor grill to high heat. When the grill is hot cook the marinated chicken breasts for 3 to 5 minutes per side, or until they're done.

4. Arrange the cooked chicken in a baking pan. Spread a layer of mexi-ranch dressing over each piece of chicken (you'll have plenty left over), followed by 1/4 cup of the shredded cheese blend. Broil the chicken for 2 to 3 minutes, or just until the cheese has melted.

5. Spread a bed of 1/2 cup of the tortilla strips or crumbled corn chips on each of four plates. Slide a chicken breast onto the chips on each plate and serve with your choice of rice and salsa.

Additional info
Crumbling shop bought tortilla chips is the easy way to make the bed of crunchy chips that the tequila lime chicken rests on. But, you can make tortilla strips like those served at the restaurant by cutting a stack of eight 6-inch corn tortillas in half.

Stack the halves on top of each other and slice the tortillas into thin strips. Fry the tortilla strips in 2 cups of oil preheated in a large skillet for 3-5 minutes or until crispy.

Salt lightly and allow to drain and cool on paper towels.

And...... that's it!

Saturday, February 14, 2009

Cocktails - Mai Tai

The Mai Tai is a well-known alcoholic cocktail purportedly invented at the Trader Vic's "Polynesian-style" restaurant in Oakland, California in 1944. Trader Vic's amicable rival, Don the Beachcomber, claimed to have created it first in 1933 at his own newly opened little bar (later a famous restaurant) in Hollywood. The Beachcomber's recipe is far more complicated than that of the Trader's and tastes quite different.
The Trader Vic story of its invention is that the Trader (Victor J. Bergeron) created it one afternoon for some friends who were visiting from Tahiti. One of them tasted it and cried out: "Maita'i roa!" (Literally "good very!", figuratively "Out of this world!") — hence the name.
Extract taken from Wikipedia.

Serves: 1 (a big one)
Ingredients:
  • 2 shots dark rum
  • 2 shots white rum
  • 1 shot cointreau (triple sec or curacao)
  • 1/2 shot amaretto - feel free to add a little more
  • 1 shot lime juice
  • 1 shot grenadine
  • 5 shots pineapple juice
1. Place all the ingredients in your shaker apart from the grenadine along with 10-12 ice cubes and shake it for 20 seconds or so until the outside of the shaker is frosted.

2. Pour into a long glass and sink the grenadine to the bottom to give a red graded effect up the drink.

3. Garnish with lemon and lime pieces and add a couple of black straws.

4. The Mai Tai can be made as a 'build' drink in the glass itself over ice but I prefer to mix the flavours with a shaker.

Enjoy...