Showing posts with label lemon. Show all posts

Thursday, May 14, 2009

Home Made Barbeque Sauce Marinade

Home Made Barbeque Sauce - BBQ Marinade


Now is definitely the season for getting the old BBQ out of the shed, brushing off the cobwebs and getting some serious sizzling done.

I don't know about you but one thing I always miss when I go to a lot of other barbeques is the lack of any form of marinading of the various meats. More often than not by the time the grilling is done you can't really tell the difference between a banger (sausage), a burger or a drumstick... In fact I've been to some barbeques were the charcoal looked more appetising :O)

The bbq marinade recipe I'm about to share with you has evolved a lot over the years and it works very well with all types of meats for the grill. It not only adds a distinctive flavouring to the meat it also helps to keep the natural flavours in too and, as the sauce drips onto the hot coals below, creates a delicious smelling smoke that will have your neighbours turning up fork in hand!

Vegetarians take note, it also works brilliantly on veggie sausages and burgers not to mention corn on the cob, courgette and aubergine (egg plant) slices. It's quite an all rounder!

TIP.
I find it is easiest to make the sauce in a jug and then pour it into an old squeezy ketchup or any sause bottle - wider neck bottles are best.

Ok...

Ingredients. (excuse the lack of measurements, just chuck it in! you'll want to alter things to your own special recipe anyway - please post it here as a comment if you do!)

As a rough guide start with 2/3 tomato sauce and 1/3 brown sauce then just add the other stuff to taste (note the honey and brown sugar is important for glazing as well as flavour)
  • Tomato Ketchup - I'm not a brandname snob but for me it's got to be Heinz every time!
  • Brown Sauce - again not a brand snob but it has to be HP!
  • Honey - the pourable type
  • Brown Sugar - about 1 1/2tbsp per pint of sauce
  • Olive Oil - a good glug plus a bit
  • Mustard - eg a mild Dijon or the yellow stuff that's great on hot dogs
  • Hoi Sin Sauce - adds a delicious smokiness and thickness. (you could probably use mesquite liquid smoke flavouring)
  • Lemon Juice - a squirt
  • Balsamic Vinegar - an equal squirt/splash
  • Worcestershire Sauce - to taste but around the same as the lemon juice etc
  • Dark Soy Sauce - as above
  • Dried Herbs - I use Rosemary, Thyme & Parsley
  • Shallots - chopped very finely, this has to squirt through the nozzle of a sauce bottle. (If you're going to use the sauce brushed on from a tub then the herbs and shallots can be larger)
  • Garlic - chopped finely as above
I think that's it...

Method.
  1. Add the ingredients 1 at a time to a mixing bowl or jug (see TIP) giving it a stir in between additions.
  2. pour the sauce into a squeezy sauce bottle
  3. You're done.
If I'm using fresh meat I give a coating of the marinade at least an hour before I begin to cook although longer is better. If I am using frozen meat I coat it in the marinade in a tub as I remove it from the freezer and then allow it to defrost.

Just before you put the meat on the grill give it another squirt and brush it all over to ensure it's coated well.

Enjoy :O)

Tuesday, May 12, 2009

How To: Cocktail Lime (or Lemon) Wedges & Slices


Nothing sets off an ice cold, summer cocktail better than a Lemon or Lime wedge or slice. Quick and very easy to dmake, the only specialised piece of equipment you need is a Canelle Knife (Check out the Gustav Emil Ern, Tools, Canelle Knife, Right Handed)


Lime Wedges


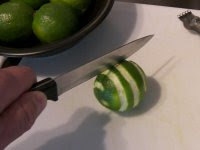
Start at the top in the middle (near the stalk bit) and cut away a strip of the lime zest around the lime in a circular motion until you get to the bottom. It doesn't matter if the zest breaks part way through the cut but with a little practice you'll be able to peel a full zest strip in one go. You should end up with something like the photo below.


With a sharp knife cut the lime in half, cutting across the exposed white part of the lime as shown below.


Depending on the size of the wedges you want cut each half into two or three small wedges like so:


Easy... :O)

Lime Slices

This time start at the top of the lime with the canelle knife and cut vertically down to the bottom of the lime to remove a short strip of zest (by the way, keep the removed zest strips from wedges and slices, they are packed with flavourful oils and can also be used to add to cocktails or to wipe around the rim of your cocktail glasses).

Turn the lime around 180 degrees and make another vertical cut - opposite to the first cut. Then turn the lime 90 degrees and cut two more vertical strips between the first two cuts. Cut again between each of the first four cuts giving a total of eight vertical cuts. Your Lemon or Lime should look something like this...


Turn the lime on it's side and cut the end off, the end can be used turned inside out and filled with a liqueur to be floated on the top of some cocktails.

Slice the lime as shown below,

and you end up with a few of these.

If you want to sit the slice onto the edge of a cocktail glass, make a single cut from the edge to the centre like so...

The lime slice can then be easily and securely placed onto the rim of your glass.

Cheers!


Monday, February 23, 2009

Lemon & Lime Baked Cheesecake

I don't know about you but I absolutley adore Cheesecake and I have recently discovered the delicious, mouth watering, Goddess of flavour, the baked type of Cheesecake. I say I discovered it but truth be told it was my Mum who started making us these amazing Raspberry baked cheesecakes some time last year.

Recently my folks went away for a few days around Bordeaux in their motor-home so I decided a recipe raid was in order and, having broken into their house, went on a rampage through the kitchen seeking that oh so special recipe... it would be mine... oh yes, it would be mine.

Alas, I couldn't find the recipe anywhere so having hired a team of builders to repair the damage to my folks house I set about Googling for baked cheesecakes.

After a few disasters I set about creating my own hybrid recipe and this is what I'd like to share with you now - when my folks return from their holiday I'll ask Mum to post her recipe on here too but for now....

You'll need the following:

A round baking tin thing (22cm), you know the ones with the pop out bottom - greased. (I had to wash mine and start again after my wife informed me butter would be better than the car axle grease I was using)
An electric whisk - A hand whisk will suffice but please read on....
Plastic or wooden spoon
Couple of glass or plastic bowls
A tall, straight drinking glass (slim Jim) for forming the sides of the biscuit base
A knife or two and an egg whisk
A glass of red wine or your preferred beverage (optional)

Ingredients:
  • 250g plain sweet biscuit (crumbed)
  • 125g butter, melted
  • 3 eggs, lightly beaten
  • ½ cup castor sugar - regular sugar blended in a mini food processor works ok too
  • 3 x 250g packets plain cream cheese, softened.
  • 3 teaspoons grated lemon rind - use a canelle knife if you have one
  • ¼ cup lime juice
Method:

1. Lightly grease your 22cm pop out bottom baking tin with some butter - if you want a deeper cheesecake, use a smaller diameter tin though you may have to increase the cooking time to allow for the extra depth, possibly in a slightly cooler oven.

1b. Take a sip of the wine or your chosen beverage.

2. Mix the biscuit crumbs and melted butter together in a bowl using a plastic or wooden spoon. You'll be able to tell when the mixture is combined enough as it will begin to stick together when pressed with the back of the spoon.

3. Add the crumb mix to the baking tin and use the tall drinking glass to press the crumb mixture evenly over the base and up the side of the tin.

4. Refrigerate the biscuit crust for around an hour.

4b. Take a seat and have a read or watch the TV with your wine or chosen beverage. After 45 minutes (15 minutes before your biscuit base is chilled) put your oven on set to around 160-170C and continue to stage 5.

5. Crack the eggs into a bowl and beat them together with the sugar with an electric mixer until pale and thick. Hand whisks are OK but this process can take up to 10 minutes...

6. Add the cream cheese, grated lemon rind and lime juice and then continue to whisk the mixture until it is smooth and creamy.

7. Pour the mixture into your chilled and crumb base filled baking tin and bake in the oven for about 45 minutes. Note: You should remove the baking tin/crumb base from the fridge prior to pouring in the mixture and placing in the oven :O)

8. After cooking, allow your cheesecake to cool in oven with door ajar, then refrigerate for several hours or overnight.... overnight? yeah right! I lasted 4 hours.

9. To serve. decorate with cream and fruit if you wish, I used a home made raspberry sauce that I found kicking about in the back of my fridge.


Recipe notes
Low fat cream cheese works just as well and with no apparent loss in flavour.