Saturday, July 18, 2009

Nora's Broccoli & Cream Cheese Crumble

This is so quick and simple to make I didn't even get round to taking a photo :O(
Some Broccoli, Yesterday.

My best friend was recently involved in a serious motorcycle collision with a car after the driver decided to perform a U-turn in the road with no warning. The good news is my friend is now well on the way to making a fantastic recovery.

The reason for this little tale is that whilst staying with his family during the early days after the accident (helping out with hospital trip transport etc and general, friendly support) my friends mum - Nora - cooked a broccoli bake to have as a side dish with a BBQ one evening.

At the time I figured Broccoli Bake was Broccoli Bake (ie the scourge of early days vegetarian pub food) but the smells drifting from the kitchen soon peaked my interest...

After my first mouthful I was well and truly hooked! totally delicious so here it is:

Serves 6 as a side dish - 3 as a main - or 1 if it's me :O)
Ingredients:
  • Two large broccoli heads - rinsed & broken into small florets
  • 300g Cream Cheese - Philadelphia if you're really posh but I just use my supermarkets own brand.
  • 300g Unsalted Butter
  • 400g TUC crackers (rectangular cheesy biscuits) - crumbled finely
Method:
  1. Steam the broccoli until tender.
  2. Pre-heat your oven to around 190C while you carry on with the rest.
  3. Melt the cream cheese and butter together in a pan (or microwave in a plastic bowl).
  4. Mix the broccoli with the cheese butter mixture and combine - allow the broccoli to break apart a bit.
  5. Add the mixture to an oven dish and sprinkle liberally with the cheese biscuit crumbs.
  6. Place in the oven on a low shelf for around 40 minutes or until the top is golden brown.
  7. Eat.
  8. Make more...
  9. Eat again :O)
My friend continues to make progress and even though I had to return home after a month my thoughts are still with him and his family. Thanks again to Nora for this quick, easy & delicious broccoli bake.

Monday, June 15, 2009

Delicious Party Chicken Drumsticks


I'm currently back home in the UK for my Father in law's 60th birthday and my wife and I were asked to help out with some of the catering for the buffet.

Having been the victim of awful, dry and tasteless chicken in the past at buffets I quickly decided I wanted to make some drumsticks with a difference. They would be served cold but I wanted them to be not only succulent and moist but also have a unique flavour.

The secret here is not just the marinade but also several bastes with the juices during the cooking as well as turning the drumsticks.

Equipment:

  • ZipLoc bags or a large, lidded bowl - to marinade the chicken.
  • A roasting tray - or several depending on the amount you're cooking.
  • A cooling rack.
  • Some tin foil (alu foil).
  • Glass jug.
  • Basting pump thing - I don't bother with one of these I tend to pour the juices from the tray into the jug and then pour it back over maybe giving it a brush too.

Ingredients:

For the marinade - for 80 drumsticks
  • 2 litres apple juice
  • 1 bottle maple syrup
  • 3 sticks cinnamon roughly broken
  • 2-3 tablespoons muscavado sugar dissolved in hot water
  • 10-20 cloves of garlic - up to you how garlicky - peeled or unpeeled and crushed
  • Olive oil - a good splash - maybe 4 to5 tablespoons
  • Soy sauce - 4 to 5 tablespoons
  • Malt vinegar - 1 to 2 tablespoons
80 Chicken drumsticks

Method:

1) Mix all the marinade ingredients together in a large bowl.

2) Add the chicken to the marinade either in the bowl or spread the chicken out into several ZipLoc bags and pour the marinade into the bags - enough to cover the meat.
3) Leave for 24 hours in the refrigerator.
4) Pre-heat the oven to 200C (gas mark 6).
5) Place the chicken into the baking tray/s and place in the oven for 20 minutes.

6) Remove from oven and turn the chicken over, pour the juices into the jug (or use a basting pump thing) and pour them back over the meat.
7) Return to the oven for another 20 minutes.
8) Remove from the oven again and pierce the thickest part of the largest drumstick with a sharp knife, if the juices are clear the chicken is done.
9) Remove the chicken from the baking tray/s and place on the cooling rack.

The marinade should have stuck to the chicken giving it a golden glaze and the meat itself should be succulent, tender and as was the case at our party create a great deal of positive comments from your guests.

Enjoy.

ps The marinade also works great with pork steaks, ribs etc

Thursday, May 14, 2009

Luxury Cauliflower Cheese

If you are fed up with boring old cauliflower cheese, give this a try it is delic.........

Ingredients
  • 225 g (8 oz) leeks, sliced
  • 175 g (6 oz) carrots, diced
  • 450 g (1 lb) cauliflower florets (or you can use half cauli and half broccoli if you like)
  • 300 ml (10 fl oz) milk
  • 50 g (2 oz) any type blue cheese
  • 25 g (1 oz) cornflour
  • 50 g (2 oz) grated cheese (whatever you have in the fridge)
  • 2 tsp chives
  • 1 tsp mustard (I use Dijon but use any you have)
  • salt and ground black pepper
Topping
  • 25g (1oz) grated cheese
  • 15 g (1/2 oz) fresh wholemeal breadcrumbs
Method
  1. Cook the leeks, carrots and cauliflower in a large saucepan of lightly salted, boiling water for 5 minutes.
  2. Meanwhile, gently heat the milk, cornflour and cheese together, whisking all the time until smooth. When the milk and cheese mixture is almost boiling, turn heat down and cook, stirring, until you have a thick and smooth sauce. Add chives, mustard and seasoning and stir well.
  3. Transfer the drained vegetables to a flameproof dish and pour over the sauce. Mix together the grated cheese and breadcrumbs and sprinkle over the top. Grill under a medium heat for 2-3 minutes until the topping is bubbling and golden. Serve at once.

Home Made Barbeque Sauce Marinade

Home Made Barbeque Sauce - BBQ Marinade


Now is definitely the season for getting the old BBQ out of the shed, brushing off the cobwebs and getting some serious sizzling done.

I don't know about you but one thing I always miss when I go to a lot of other barbeques is the lack of any form of marinading of the various meats. More often than not by the time the grilling is done you can't really tell the difference between a banger (sausage), a burger or a drumstick... In fact I've been to some barbeques were the charcoal looked more appetising :O)

The bbq marinade recipe I'm about to share with you has evolved a lot over the years and it works very well with all types of meats for the grill. It not only adds a distinctive flavouring to the meat it also helps to keep the natural flavours in too and, as the sauce drips onto the hot coals below, creates a delicious smelling smoke that will have your neighbours turning up fork in hand!

Vegetarians take note, it also works brilliantly on veggie sausages and burgers not to mention corn on the cob, courgette and aubergine (egg plant) slices. It's quite an all rounder!

TIP.
I find it is easiest to make the sauce in a jug and then pour it into an old squeezy ketchup or any sause bottle - wider neck bottles are best.

Ok...

Ingredients. (excuse the lack of measurements, just chuck it in! you'll want to alter things to your own special recipe anyway - please post it here as a comment if you do!)

As a rough guide start with 2/3 tomato sauce and 1/3 brown sauce then just add the other stuff to taste (note the honey and brown sugar is important for glazing as well as flavour)
  • Tomato Ketchup - I'm not a brandname snob but for me it's got to be Heinz every time!
  • Brown Sauce - again not a brand snob but it has to be HP!
  • Honey - the pourable type
  • Brown Sugar - about 1 1/2tbsp per pint of sauce
  • Olive Oil - a good glug plus a bit
  • Mustard - eg a mild Dijon or the yellow stuff that's great on hot dogs
  • Hoi Sin Sauce - adds a delicious smokiness and thickness. (you could probably use mesquite liquid smoke flavouring)
  • Lemon Juice - a squirt
  • Balsamic Vinegar - an equal squirt/splash
  • Worcestershire Sauce - to taste but around the same as the lemon juice etc
  • Dark Soy Sauce - as above
  • Dried Herbs - I use Rosemary, Thyme & Parsley
  • Shallots - chopped very finely, this has to squirt through the nozzle of a sauce bottle. (If you're going to use the sauce brushed on from a tub then the herbs and shallots can be larger)
  • Garlic - chopped finely as above
I think that's it...

Method.
  1. Add the ingredients 1 at a time to a mixing bowl or jug (see TIP) giving it a stir in between additions.
  2. pour the sauce into a squeezy sauce bottle
  3. You're done.
If I'm using fresh meat I give a coating of the marinade at least an hour before I begin to cook although longer is better. If I am using frozen meat I coat it in the marinade in a tub as I remove it from the freezer and then allow it to defrost.

Just before you put the meat on the grill give it another squirt and brush it all over to ensure it's coated well.

Enjoy :O)

Moules (Mussels)


I have always been a big fan of seafood, as a child my Mum always encouraged me to try lots of delicious fish and shellfish that my Grandad and after he'd retired, my Grandads 'contacts' used to bring home from their fishing trips aboard Grimsby (UK) based trawlers (sadly these are few and far -if any remain - between these days).

I was quite a late convert to mussels however, in fact the first time I ate them - other than inadvertently discovered, and inquisitively nibbled a bit, in a seafood soup - was just last year.

Our French neighbour invited us around for Moules et Frites (Mussels & Chips) and not knowing what to expect, went round with a couple of bottles of wine and not a little nervous trepidation.

They were delicious! This recipe is just for the mussels, I'll leave the chips for you to do.

TIP
There is a simple rule of thumb to remember when using Mussels:
Before cooking the shells must be tightly closed - discard any with open shells (if they close when you tap them, they're ok).
After Cooking the shells must be open - discard any that remain closed.

Ingredients. (serves 4)

  • 1kg Mussels
  • Olive oil - a good slug of it
  • 3 or 4 golfball sized shallots - halved and thinly sliced - half moons.
  • 2 cloves garlic - crushed, don't bother peeling them
  • 5 or 6 sprigs of thyme (my favourite herb)
  • 2 bay leaves
  • Flat leaf parsley - a good handful, roughly chopped.
  • Coarse sea salt
  • 1 75cl bottle white wine (My mussels are from the Charante Maritime department in France so I use a Charentaise white wine but just use one you like - if it isn't good enough to drink, it isn't good enough to cook with.)
Method.

  1. Leave the mussels to soak in cold water.
  2. Add the oil to a big, lidded pan (big!), throw in the sliced shallots and garlic and turn on the heat ( I always add garlic to cold oil and then heat it as it can quickly burn and go bitter if added to hot) and gently bring them to a sizzle. The shallots want to be translucent with a slight hint of browning but not browned.
  3. Add the thyme, bay and half of the parsley and throw around in the pan a bit. A couple of wooden spoons are useful for this, then add approximately 1/3 of the white wine and bring to the boil.
  4. Strain the mussels, discarding any with open shells (see TIP above) and tip them into the pan taking care not to splash yourself with the hot liquid. Place a lid on the pan and gently shake it to slosh that rich liquid around all the mussels.
  5. Add the rest of the wine, return to the boil then lower the heat and leave to simmer for a couple of minutes before gently shaking the pan again.
  6. Remove the lid, all the mussels should now be open (see TIP) so add the rest of the parsley and the salt.
  7. After a couple more minutes serve either into individual bowls or into a big central bowl along with the stock and allow everyone to tuck in along with some crispy chips (fries). The delicious stock can be mopped up with crusty bread or served separately as a soup.
Enjoy :O)

This meal can be served as a main course or as a starter (without the chips).

Tuesday, May 12, 2009

How To: Cocktail Lime (or Lemon) Wedges & Slices


Nothing sets off an ice cold, summer cocktail better than a Lemon or Lime wedge or slice. Quick and very easy to dmake, the only specialised piece of equipment you need is a Canelle Knife (Check out the Gustav Emil Ern, Tools, Canelle Knife, Right Handed)


Lime Wedges


Start at the top in the middle (near the stalk bit) and cut away a strip of the lime zest around the lime in a circular motion until you get to the bottom. It doesn't matter if the zest breaks part way through the cut but with a little practice you'll be able to peel a full zest strip in one go. You should end up with something like the photo below.


With a sharp knife cut the lime in half, cutting across the exposed white part of the lime as shown below.


Depending on the size of the wedges you want cut each half into two or three small wedges like so:


Easy... :O)

Lime Slices

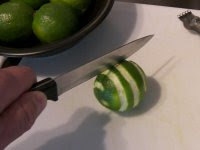
This time start at the top of the lime with the canelle knife and cut vertically down to the bottom of the lime to remove a short strip of zest (by the way, keep the removed zest strips from wedges and slices, they are packed with flavourful oils and can also be used to add to cocktails or to wipe around the rim of your cocktail glasses).

Turn the lime around 180 degrees and make another vertical cut - opposite to the first cut. Then turn the lime 90 degrees and cut two more vertical strips between the first two cuts. Cut again between each of the first four cuts giving a total of eight vertical cuts. Your Lemon or Lime should look something like this...


Turn the lime on it's side and cut the end off, the end can be used turned inside out and filled with a liqueur to be floated on the top of some cocktails.

Slice the lime as shown below,

and you end up with a few of these.

If you want to sit the slice onto the edge of a cocktail glass, make a single cut from the edge to the centre like so...

The lime slice can then be easily and securely placed onto the rim of your glass.

Cheers!


Sunday, May 10, 2009

Roasted Crushed Potatoes with Shallots, Garlic & Herbs

These delicious roasted spuds are an ideal accompaniment to a wide range of main course meals from simple sausages to roasted poultry, beef or even pan grilled steak or chicken breast. Excellent dished out onto a foil tray and popped onto a barbeque.


Ingredients:
  • 1lb Unpeeled Potatoes - (Good roasters are Maris Piper or King Edward) - the smaller the better but bigger potatoes can be cut in half.
  • 8 to 10 Shallots, peeled but keep whole.
  • 3 or 4 large garlic cloves, peeled and gently crushed.
  • 5 or 6 Sprigs of Rosemary and Thyme (use dried if you wish)
  • 1 or 2 Sage leaves (be careful how much sage you use, it's a powerful herb and can easily smother the other flavours).
  • 2 Bay leaves
  • Walnut or Extra Virgin Olive Oil (two totally different flavours, olive oil is quite acceptable but use walnut if you can, the nutty flavour goes brilliantly with this dish).
  • Coarse ground salt and black pepper.
Method:

1) Begin to pre-heat your oven to 180C (gas mark 4-5) while you prepare the potatoes.

2) Put the potatoes, shallots, garlic and half of the herbs into a pan and cover with water.

3) Bring to the boil and simmer until a sharp knife just pierces the potatoes.

4) Leave to cool slightly in the hot water for five or ten minutes then strain in a colander and allow the potatoes etc to steam dry.

5) Oil a roasting tin with a little of the walnut/olive oil.

6) One at a time, crush the potatoes using a large spoon. They don't want to be mashed up but just kind of broken apart and add them to the roasting tin.

7) Place the remaining contents of the pan (shallots, herbs etc) in among the potatoes and sprinkle the remaining un-used herbs over the top.

8) Drizzle the walnut/olive oil all over the top of the potatoes and place in the oven for an hour (longer if needed) until the potatoes are golden and crispy on the outside but soft and fluffy on the inside.
You can either serve them immediately or allow them to cool and re-heat them, quickly in a hot oven or on the barbeque in a foil tray.

Deeeelicious.

Monday, April 27, 2009

The Perfect Gin & Tonic

As the dark, cold days of winter once again pass into the warmth of a new spring and summer it's time to get into the swing of things with some nice cocktails. My favourite cocktail has to be the cool and classic Gin & Tonic, but it has to be made just right - believe me it does make a difference!

Ingredients (makes 2 large G&Ts):
  • 100ml (4 x 25ml shots) Gordon's Dry London Gin
  • Schweppes Indian Tonic
  • Ice (lots)
  • Fresh lime - cut into four wedges

Method:
  1. Fill 2 tall, straight glasses (Slim Jim/Highball 10oz or 12oz) with ice
  2. Squeeze one lime wedge into each glass and sit the other lime wedge on the ice.
  3. Pour 50ml Gordon's Gin over the ice
  4. Top up with the Indian tonic
  5. Enjoy :O)
One of my pet hates, when seeing drinks mixed, is to watch the ice being added at the end. To many people it may seem that it doesn't matter. It does! In this case, pouring the gin over the ice releases a lot more of the subtle flavours than simply adding a couple of ice cubes at the end.

I just looked at my watch and it's a little early but in an hour or so I shall be happily fixing myself a G&T - if you read this in time why not join me :O)

Cheers!

Monday, March 9, 2009

Baked Raspberry Cheesecake

Having returned from our recent trip around Bordeaux I found my kitchen trashed by an intruder who, having read his post for Lemon and Lime baked cheesecake on here, turned out to be my son Steve. During his beating he asked if I could share my recipe for Baked Raspberry cheesecake, so here it is.


Ingredients:
• 8 Breton biscuits (or any other type you prefer, that husband or kids haven't eaten)
• 50g butter, melted
• 600g cream cheese
• 2 tbsp plain flour
• 175g caster sugar
• vanilla extract
• 3 eggs
• 142ml crème fraiche
• 300g raspberries
• icing sugar

Method:
1. Heat the oven to 180C/fan 160C/gas 4. Crush the biscuits in a food processor (or put in a plastic bag and bash with a rolling pin)

2. Mix with the melted butter and press into a greased 20cm springform tin. Cool in fridge until filling is ready

3. Beat the cream cheese with the flour, sugar, a few drops of vanilla, eggs, and crème fraiche until light and fluffy. Stir in half the raspberries and pour into the tin.

4. Bake for 40 minutes and then check, it should be set but slightly wobbly in the centre. Leave in the tin to cool.

5. Keep a few raspberries for the top and put the rest in a pan with 1 tbsp icing sugar. Heat until juicy and then squash with a fork. Push through a sieve.

6. Serve the cheesecake with the raspberry sauce and raspberries.

French Onion Soup - With Cheesy Toast Rafts

I think this delicious soup has to be one of my favourites. Living in France it would be a shame not to be able to create a satisfying and flavour packed dish from the superb quality onions grown around us.

I have labelled this French Onion Soup recipe as a starter but quite often I enjoy it as a wholesome lunch served with a few chunks of locally made, fresh baguette and a crisp white Chardonnay.

Serves: 4-6
Preparation & cooking time: About an hour

Ingredients:
  • 1lb of medium sized onions (30-40mm diameter at the widest point)
  • Olive oil
  • Butter
  • 2 cloves garlic - finely chopped
  • 2 or 3 sprigs of dried thyme
  • 1 bouquet garni (the tea bag type are fine)
  • Balsamic vinegar
  • 2 litres beef stock (vegetable stock can be substituted)
  • 175ml white wine (A large glass - feel free to have a secondary one yourself)
  • Salt & pepper
  • French bread baguette
  • Grated cheese (If you can get it, Cantal is ideal. Otherwise, a mature cheddar)
Equipment:
  • Large saucepan with lid
  • Chopping board and sharp kitchen knife
  • Wooden spoon
Method:

1. Peel the onions and slice them into very fine, whole rings. Slice them as thinly as you can manage safely.

2. Heat the olive oil in the pan, add a 'generous' knob of butter and allow it to melt. As the butter begins to bubble, add the sliced onions.

3. Toss the onions around in the pan, coating them in the oil and butter. Add the sprigs of thyme and the bouquet garni.

4. Place the pan on your smallest hob and turn the heat to the lowest setting. Cover the pan allowing the onions to gently simmer and gradually begin to caramelise. Do not be tempted to rush this stage, the slower the onions cook, the sweeter the flavour they impart to the finished soup.

5. When the onions are sufficiently caramelised (a nice golden brown colour) add a splash of the Balsamic vinegar and stir the onions until the vinegar has evaporated off. Add the stock and the white wine, re-cover the pan, then turn up the heat bringing the soup to the boil.

6. Lower the heat once again, season to taste with salt and pepper, then allow your soup to simmer for at least half an hour. The longer you simmer the soup, the more flavoursome it becomes, if you have a slow-cooker feel free to use it.

7. Cut the baguette into approx 25mm (1 inch) slices allowing two per portion and grill both sides.

8. Sprinkle each toasted baguette slice with cheese and season with a little salt and pepper if you wish.

9. When the time comes to serve the soup put the cheesy baguette slices back under the grill to melt the cheese. While the cheese is melting, you can begin to serve the soup into your bowls.

10. Add two grilled cheese floats to each bowl and serve immediately.

Enjoy!

Tuesday, February 24, 2009

Pan Griddled Steak & Wild Mushrooms

Here's a pretty quick and easy steak dish that requires very little advance preparation. Great served with chips (fries) or a nice green leafy salad and a robust red wine, perhaps a Vin de Pays d'Oc Cabernet Sauvignon. Serves 4

Ingredients:
  • 4x good sized steaks (rump, sirloin, rib-eye - whatever you prefer!)
  • Extra virgin olive oil
  • Balsamic vinegar
  • Worcestershire sauce (Interesting factoid: In the UK it's pronounced Wusster, the 'shire' remains unpronounced.)
  • Dark soy sauce
  • Mixed peppercorns (in a pepper mill if possible otherwise a pestle & mortar to crush them)
  • Salt - good chunky sea salt is best
  • Dried thyme and rosemary
  • A selection of mushrooms. I tend to use regular white button mushrooms, chanterelle (girolles), oyster (pleurots) and a few chopped cepes (porcini). You can chop or slice or do what you like with them. If they're small I tend to use them whole or halved.
  • Butter
  • 250ml red wine
Method:
(Marinade the steaks for at least 4 hours in the fridge):

1. For lack of better words, glug a good measure of olive oil into a glass bowl, add to it a splash of Balsamic Vinegar and a few drops of Worcestershire and Soy sauce.

2. Beat the liquids together with a small whisk to create a thickish emulsion and add to it a pinch or two of the thyme and rosemary.

3. Place the steaks in a dish and pour the marinade over them (It's difficult to give measurements as it depends on the size of the steaks but they don't want to end up swimming in marinade if that helps).

4. Grind the mixed peppers corns (to suit your taste, I use a lot) over the steaks along with a few crystals of sea salt. Turn the steaks to repeat the seasoning on the other side. Turn the steaks a couple more times to ensure they are coated with the marinade then clingfilm/wrap them and place in the refrigerator for at least 4 hours.

5. Around half an hour before cooking remove the steaks from the fridge and set them to one side.

6. Heat your griddle pan and rub it over with a little olive oil.

7. Lifting the steaks from the marinade with tongs or a fork, allow the marinade liquid to drain off them and carefully place them in your hot griddle pan (Caution: The marinaded steaks are likely to spit as they're added to the hot pan, so mind your hands!) and cook them to your liking; rare, medium or well done. Once cooked, remove the steaks and keep them warm.

8. Add a knob of butter to the vacated griddle pan and a little extra olive oil if needed to prevent the butter from burning. Throw in the mushrooms and with a couple of wooden spoons keep them tossed around and turning in the butter/meat juices - think stir fry!

9. Once the mushrooms are coated and beginning to cook down add the wine (again watch out for sizzles and spits as it hits the hot pan) and allow it to reduce to a sauce.

10. Serve the steaks immediately with the wild mushroom and wine sauce poured over them.

Monday, February 23, 2009

Lemon & Lime Baked Cheesecake

I don't know about you but I absolutley adore Cheesecake and I have recently discovered the delicious, mouth watering, Goddess of flavour, the baked type of Cheesecake. I say I discovered it but truth be told it was my Mum who started making us these amazing Raspberry baked cheesecakes some time last year.

Recently my folks went away for a few days around Bordeaux in their motor-home so I decided a recipe raid was in order and, having broken into their house, went on a rampage through the kitchen seeking that oh so special recipe... it would be mine... oh yes, it would be mine.

Alas, I couldn't find the recipe anywhere so having hired a team of builders to repair the damage to my folks house I set about Googling for baked cheesecakes.

After a few disasters I set about creating my own hybrid recipe and this is what I'd like to share with you now - when my folks return from their holiday I'll ask Mum to post her recipe on here too but for now....

You'll need the following:

A round baking tin thing (22cm), you know the ones with the pop out bottom - greased. (I had to wash mine and start again after my wife informed me butter would be better than the car axle grease I was using)
An electric whisk - A hand whisk will suffice but please read on....
Plastic or wooden spoon
Couple of glass or plastic bowls
A tall, straight drinking glass (slim Jim) for forming the sides of the biscuit base
A knife or two and an egg whisk
A glass of red wine or your preferred beverage (optional)

Ingredients:
  • 250g plain sweet biscuit (crumbed)
  • 125g butter, melted
  • 3 eggs, lightly beaten
  • ½ cup castor sugar - regular sugar blended in a mini food processor works ok too
  • 3 x 250g packets plain cream cheese, softened.
  • 3 teaspoons grated lemon rind - use a canelle knife if you have one
  • ¼ cup lime juice
Method:

1. Lightly grease your 22cm pop out bottom baking tin with some butter - if you want a deeper cheesecake, use a smaller diameter tin though you may have to increase the cooking time to allow for the extra depth, possibly in a slightly cooler oven.

1b. Take a sip of the wine or your chosen beverage.

2. Mix the biscuit crumbs and melted butter together in a bowl using a plastic or wooden spoon. You'll be able to tell when the mixture is combined enough as it will begin to stick together when pressed with the back of the spoon.

3. Add the crumb mix to the baking tin and use the tall drinking glass to press the crumb mixture evenly over the base and up the side of the tin.

4. Refrigerate the biscuit crust for around an hour.

4b. Take a seat and have a read or watch the TV with your wine or chosen beverage. After 45 minutes (15 minutes before your biscuit base is chilled) put your oven on set to around 160-170C and continue to stage 5.

5. Crack the eggs into a bowl and beat them together with the sugar with an electric mixer until pale and thick. Hand whisks are OK but this process can take up to 10 minutes...

6. Add the cream cheese, grated lemon rind and lime juice and then continue to whisk the mixture until it is smooth and creamy.

7. Pour the mixture into your chilled and crumb base filled baking tin and bake in the oven for about 45 minutes. Note: You should remove the baking tin/crumb base from the fridge prior to pouring in the mixture and placing in the oven :O)

8. After cooking, allow your cheesecake to cool in oven with door ajar, then refrigerate for several hours or overnight.... overnight? yeah right! I lasted 4 hours.

9. To serve. decorate with cream and fruit if you wish, I used a home made raspberry sauce that I found kicking about in the back of my fridge.


Recipe notes
Low fat cream cheese works just as well and with no apparent loss in flavour.

Sunday, February 22, 2009

Tequila Lime Chicken

This tasty chicken dish combines the tangy flavour of the tequila and lime marinade with a creamy, south western style dressing and tops it all off with a melted cheese blend. Note: Be sure you don't marinade the chicken longer than 3 to 4 hours or the citric acid in the lime juice may toughen the chicken. You can serve this dish with your choice of rice but personally, I love this dish served with crispy, thin cut chips (French Fries) with maybe a little salsa on the side. Serves 4

Ingredients:

For The Chicken Marinade
  • 1 cup water
  • 1/3 cup teriyaki sauce - see our Chicken Teriyaki recipe
  • 2 tablespoons lime juice
  • 2 teaspoons minced garlic
  • 1 teaspoon mesquite liquid smoke flavouring
  • 1/2 teaspoon salt
  • 1/4 teaspoon ground ginger
  • 1 shot (25ml) tequila

4 chicken breast fillets

For The Mexi-Ranch Dressing
  • 1/4 cup mayonnaise
  • 1/4 cup sour cream/creme fraiche
  • 1 tablespoon milk
  • 2 teaspoons minced tomato
  • 1 1/2 teaspoons white vinegar
  • 1 teaspoon minced canned jalapeno slices
  • 1 teaspoon minced onion
  • 1/4 teaspoon dried parsley
  • 1/4 teaspoon Tabasco or a hot pepper sauce
  • 1/8 teaspoon salt
  • 1/8 teaspoon dried dill
  • 1/8 teaspoon paprika
  • 1/8 teaspoon cayenne pepper
  • 1/8 teaspoon cumin
  • 1/8 teaspoon chili powder - you can increase this for extra heat
  • pinch garlic powder
  • pinch ground black pepper

For the cheese melt topping and crispy base
1 cup grated Cheddar/Monterey Jack cheese blend (M Jack can be hard to find but to be honest I've made this dish using all sorts of cheeses (as long as they melt).
2 cups crumbled corn chips or fried tortilla strips

1. Prepare marinade by combining marinade ingredients in a medium bowl. Add the chicken to the bowl, cover and chill for 2 to 3 hours.

2. Make the mexi-ranch dressing by combining all of the ingredients in a medium bowl. Mix well until smooth, then cover dressing and chill it until needed.

3. When you are ready to prepare the entree, preheat the oven to high broil. Also, preheat your barbecue or indoor grill to high heat. When the grill is hot cook the marinated chicken breasts for 3 to 5 minutes per side, or until they're done.

4. Arrange the cooked chicken in a baking pan. Spread a layer of mexi-ranch dressing over each piece of chicken (you'll have plenty left over), followed by 1/4 cup of the shredded cheese blend. Broil the chicken for 2 to 3 minutes, or just until the cheese has melted.

5. Spread a bed of 1/2 cup of the tortilla strips or crumbled corn chips on each of four plates. Slide a chicken breast onto the chips on each plate and serve with your choice of rice and salsa.

Additional info
Crumbling shop bought tortilla chips is the easy way to make the bed of crunchy chips that the tequila lime chicken rests on. But, you can make tortilla strips like those served at the restaurant by cutting a stack of eight 6-inch corn tortillas in half.

Stack the halves on top of each other and slice the tortillas into thin strips. Fry the tortilla strips in 2 cups of oil preheated in a large skillet for 3-5 minutes or until crispy.

Salt lightly and allow to drain and cool on paper towels.

And...... that's it!

Wednesday, February 18, 2009

Honey BBQ Chicken Wings

This great recipe re-creates a KFC style crispy breading on the chicken wings and a delicious sweet and tangy, honey BBQ sauce.

This makes 2 to 4 servings (20 wings) depending on how hungry you are.


Ingredients:

For The Sauce
  • 1 1/4 cup ketchup
  • 1/3 cup white vinegar
  • 1/4 cup molasses
  • 1/4 cup honey
  • 1 teaspoon Mesquite/Liquid smoke* (see tidbits)
  • 1/2 teaspoon salt
  • 1/4 teaspoon onion powder
  • 1/4 teaspoon chili powder
For The Crispy Coating
  • 6 to 8 cups vegetable oil
  • 1 egg, beaten
  • 1 cup milk
  • 2 cups all-purpose flour
  • 2 1/2 teaspoons salt
  • 3/4 teaspoon pepper
  • 3/4 teaspoon MSG** (Optional)
  • 20 chicken wing pieces

1. Combine the sauce ingredients in a small saucepan over a medium heat. Stir until the ingredients are well combined and bring to a boil. Then reduce the heat and simmer uncovered for 15 to 20 minutes to thicken.

2. As your sauce is simmering, heat up 6 to 8 cups of oil in a deep fryer set to 350 degrees.

3. Combine the beaten egg with the milk in a small bowl.

4. In another small bowl, combine the flour, salt, pepper and the optional MSG.

5. When the vegetable oil is hot, dip each wing first in the flour mixture, then into the milk and egg mixture, and then back into the flour. Arrange wings on a plate until each one is coated with the flour, milk/egg mixture.

6. Fry the wings for 9 to 12 minutes or until light golden brown. If you are using a small fryer or pan, you may wish to fry the wings in smaller batches. After frying the wings, allow them to drain on paper towels or a cooling rack.

7. When the sauce is done, brush the entire surface of each wing with a light coating of sauce. Serve immediately. Note: You may want to ensure a good supply of paper towels/napkins :O)

Additional Info
*Mesquite/Liquid smoke
A flavoring found in many stores near the barbecue sauces and marinades. Use hickory-flavored liquid smoke if you have a choice.


**MSG
Monosodium Glutamate, the solid form of a natural amino acid found in many vegetables. It can generally be found in oriental food markets and is often labelled as Gourmet Powder flavour enhancer. MSG is very popular in a lot of oriental dishes but it's use has become somewhat controversial. Check out this article from the Guardian newspaper about MSG in food.

Saturday, February 14, 2009

Cocktails - Mai Tai

The Mai Tai is a well-known alcoholic cocktail purportedly invented at the Trader Vic's "Polynesian-style" restaurant in Oakland, California in 1944. Trader Vic's amicable rival, Don the Beachcomber, claimed to have created it first in 1933 at his own newly opened little bar (later a famous restaurant) in Hollywood. The Beachcomber's recipe is far more complicated than that of the Trader's and tastes quite different.
The Trader Vic story of its invention is that the Trader (Victor J. Bergeron) created it one afternoon for some friends who were visiting from Tahiti. One of them tasted it and cried out: "Maita'i roa!" (Literally "good very!", figuratively "Out of this world!") — hence the name.
Extract taken from Wikipedia.

Serves: 1 (a big one)
Ingredients:
  • 2 shots dark rum
  • 2 shots white rum
  • 1 shot cointreau (triple sec or curacao)
  • 1/2 shot amaretto - feel free to add a little more
  • 1 shot lime juice
  • 1 shot grenadine
  • 5 shots pineapple juice
1. Place all the ingredients in your shaker apart from the grenadine along with 10-12 ice cubes and shake it for 20 seconds or so until the outside of the shaker is frosted.

2. Pour into a long glass and sink the grenadine to the bottom to give a red graded effect up the drink.

3. Garnish with lemon and lime pieces and add a couple of black straws.

4. The Mai Tai can be made as a 'build' drink in the glass itself over ice but I prefer to mix the flavours with a shaker.

Enjoy...

Japanese Egg Fried Rice - Benihana Styleee

When a 20 year old Rocky Aoki arrived in New York City from Japan in 1959 he was convinced it was the land of opportunity. Just five years later he took the $10,000 he had saved plus another $20,000 that he borrowed and opened a Benihana steakhouse on the West side of Manhattan.

His ground breaking idea to bring the chefs out from the kitchen to prepare the food in front of customers (on specially designed hibachi grills) was an instant hit. The restaurant was such a success that it paid for itself within six months.

Here's a recipe for egg fried rice just like that served at Benihana, prepared by chefs with pre-cooked rice on those open hibachi grills.

Serves: 4
Ingredients:
  • 4 cups cooked rice (long grain)
  • 1 cup frozen peas (thawed)
  • 2 tablespoons carrot (grated or chopped)
  • 2 eggs, beaten
  • 1/2 cup diced onion
  • 1 1/2 tablespoons butter
  • 2 tablespoons soy sauce
  • Salt & Pepper to taste
1. Cook the rice following the instructions on package. Pour the cooked rice into a large bowl and allow it to cool in the refrigerator.

2. Scramble the eggs in a wok or pan over a medium heat. Separate the scrambled chunks of egg into small, pea-sized bits while cooking.

3. When the rice has cooled to near room temperature, add the peas, carrot, scrambled egg and diced onion to the bowl and gently toss all of the ingredients together.

4. Melt 1 1/2 tablespoons of butter in a large frying pan over medium/high heat until completely melted and add the bowl of rice and other ingredients into the pan.

5. Add the soy sauce plus the salt and pepper and cook the rice for 6-8 minutes over heat, stirring regularly. Serve.

Serving suggestion.
This rice makes a great meal on it's own but it can also be served as an excellent accompaniment to our delicious Chicken Teriyaki recipe.

Seasoned Ginger Oil

This is really a super quicky recipe but if you're like me you'll find this oil indispensable when cooking Chinese food. It is also very effective when used with my Teriyaki Chicken recipe too.

Ingredients:
  • Fresh root ginger (a good, thumb length piece per 250ml oil)
  • Sunflower or vegetable oil (not olive oil!)
1. Peel the ginger and chop it into 10-15mm cubes
2. Add the oil and ginger pieces to a cold pan
3. Begin to heat the oil and when the ginger begins to sizzle turn off the heat and allow the oil to cool
4. Bottle the cooled oil - you can strain or retain the ginger pieces as you like.

Told you it was a quicky :O)

Restaurant Style Teriyaki Chicken

Delicious Chicken Teriyaki in 10 easy to follow steps

Serves: 4
Ingredients:

  • 4 Chicken breasts with skin on
  • 4 tbsp soy sauce
  • 2 tbsp Sake (rice wine)
  • 4 tbsp Mirin (sweet rice wine)
  • 2 tbsp sugar
  • 1 clove garlic (Optional) finely chopped
  • 1 to 2 tbsp vegetable oil (or try our seasoned ginger oil)
Note: If Mirin is not available you can use regular rice wine and increase the amount of sugar to taste.

For The Garnish
Grated ginger - Available from Asian supermarkets but easily prepared using fresh ginger blended with a little water.

1. Pierce the skin on each chicken breast with a fork.

2. Mix the other ingredients together in a bowl.

3. Marinade the chicken in the mixture and place in the refrigerator for 15 to 30 minutes.

4. Remove the chicken from the marinade mixture and retain the leftover marinade for later use.

5. Heat the vegetable oil (or our seasoned ginger oil if you're using that) in a frying pan and fry the chicken, skin side first over a medium heat until the skin has browned.
6. Turn the chicken pieces over and gently fry the other side over a low heat.

7. Pour the retained marinade mixture over the chicken in the pan and cover, allowing the chicken to steam cook over a low heat until it's cooked through.


8. Remove the cover and allow the sauce to simmer until it becomes thick.
9. Remove the pan from the heat. Slice the chicken breasts diagonally and serve them on a plate.

10. Pour the thickened Terikayi sauce from the pan over the chicken and garnish with the grated ginger (Optional).

Serving suggestion.
Why not try this delicious Chicken Teriyaki with our Benihana style, Japanese Egg Fried Rice or alternatively served cold in a pitta bread pocket with salad.